Settings
The Settings are found in the menu in the top right corner of the program.
General
This menu is where you decide to have your program appear and work.

- Theme - You can select the user interface display theme. A number of different color schemes are available - both dark and light.
- Main Window - Lets you choose the appearance of the program at startup. Choose default or simple capture. This setting will not take effect until you restart the program.
- Interface language - A number of languages are already available. If you want to help translate to your own language, you can use Transifex for online translation.
- Minimize to tray icon - When application is minimized an icon will show in tray bar and not in taskbar.
- Start minimized - The application will start with minimized window.
- Start when Windows starts.
Preview
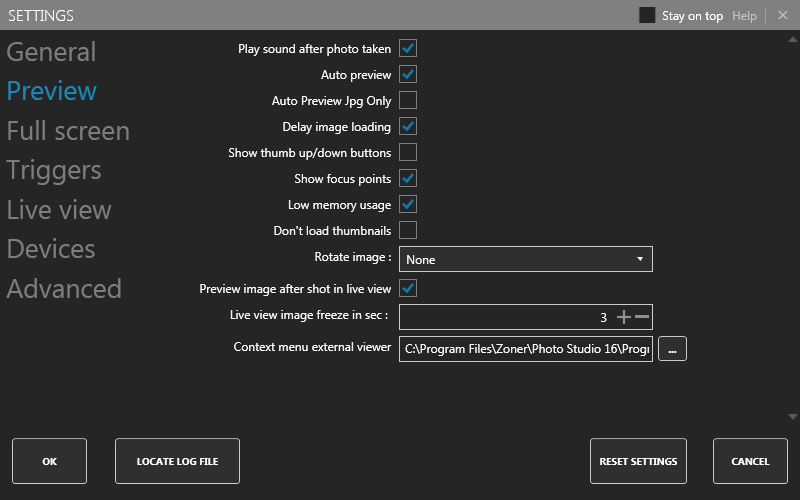 Preview is where you can control the aspects of the picture preview that you will see after you have shot one, or a series of photographs.
Options that can be changed are:
- Plays sound after photo has been taken. This uses the sound file from c:\Program Files\digiCamControl\Data\takephoto.wav.
- Auto preview. When a new photo is taken, it will be selected in a listbox and displayed. This option requires CPU power, especially for RAW files. If transfer speed is critical, this option can be unchecked; such as when shooting high speed sequences or with multiple cameras.
- Show focus points. This option will display the focus points used by the camera when shooting the picture. This feature works only with photos taken by a Nikon camera.
- Low memory usage. Save memory where possible. Useful when shooting with multiple cameras.
- Preview image after shot in live view. Retain the picture in the live view window for a number of seconds before going back to the live picture.
- Rotate image. Rotate the image a number of degrees clockwise. Can be handy for always rotating images, like when using the camera upside-down.
- Don't load thumbnails.
- Fullscreen window background. Select background color.
Full Screen

- Show magnifier in full screen - If checked a loop will show in place of mouse which will magnify the image around the mouse cursor
- Full screen window background color - This color will show around of full screen image
- Preview image after capture in full screen - Automatically the full screen will show up after image transfer is done. This option is more usable when the camera capture button is used.
- Preview time in sec - Time after the full screen window will close automatically.
- Use external viewer - If checked the specified application will be used in place of application full screen window.
- External viewer path - Full path to application which will be used in place of full screen.
- External viewer arguments - Additional argument for the application, special argument %1 will be replaced with filename.
Example to use IrfanView as full screen viewer:
External viewer path = C:\Program Files (x86)\IrfanView\i_view32.exe
External viewer arguments = %1 /one /fs
Triggers
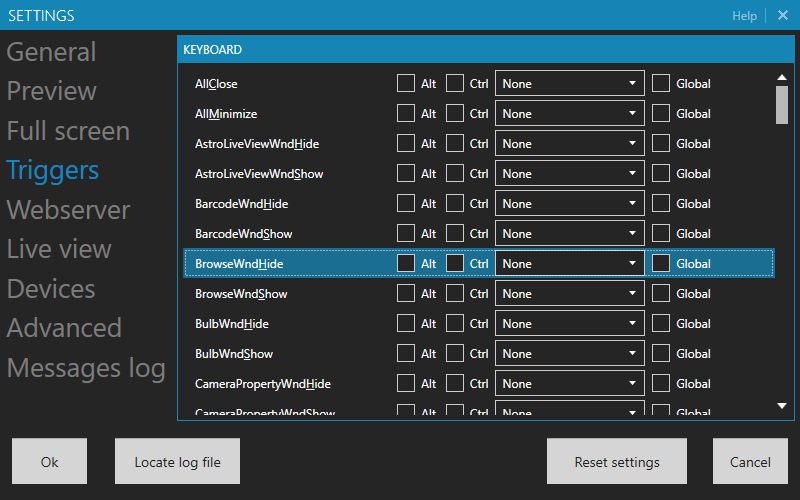 In this section, you can select the way you want to trigger the camera. You can also use your mouse and the built-in button at the top left button row. Your options are:
- Use the keyboard to trigger actions in application. Select a key to trigger the photo capture. This key may be combined with Alt, Ctrl or Shift. The Global will make available Windows wide the key press event.
- Use a web server. If this is checked, the application can be controlled using a smartphone or another PC connected to the same local network. After having checked the box, you will need to restart the program to activate the web server. If the webserver is active a button will show up in main windows toolbar which will provide a qrcode to the webserver webaddres. You can also scan the QR code with the camera in your phone to go directly to the control site. You might need a QR scanner app for the purpose. These are widely available and most of them are free. Under some circumstances, additional settings can be needed - like open port 5513. See your antivirus or firewall documentation.
Webserver

- Use web server : If this is checked, the application can be controlled using a smartphone or another PC connected to the same local network. After having checked the box, you will need to restart the program to activate the web server. If the webserver is active a button will show up in main windows toolbar which will provide a qrcode to the webserver web address. You can also scan the QR code with the camera in your phone to go directly to the control site. You might need a QR scanner app for the purpose. These are widely available and most of them are free. Under some circumstances, additional settings can be needed - like open port 5513. See your antivirus or firewall documentation.
- Allow interaction via web server : Disable when multiple user use the web interface to prevent to send back any command to application
- Allow public access : web interface access from anywhere no more required to be in same local network. This option is disabled by default. The public url can be accessed in qr code window combo box. The URL always start with http://digicamcontrol.com/remote/ and a generated unique id, this id remain same until you reset settings. This feature is useful when you run a long term timelapse you can check the status of camera from anywhere with a internet connection or in photo studio you can share the captured photos without giving access to local network to the user.
Live View
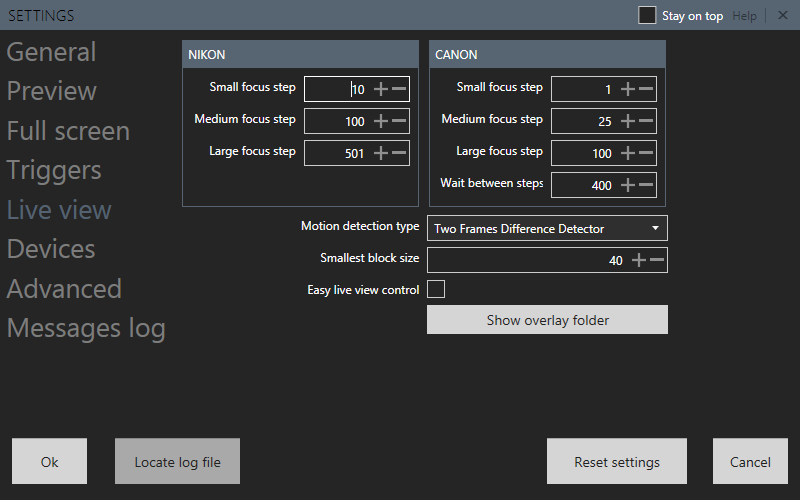 In this section, you will find settings related to live view. Not all cameras support live view.
- Small, medium and large focus steps - This sets the step size you want the camera to use when using the program to focus manually.
- Motion detection type
- Two Frames Difference Detector - This setting is suitable for fast motion detection, but will not detect very slow motion
- Simple background Modeling detector - This setting is suitable for slow motion detection, but this may cause false detection such as ambient light changes.
- Smallest block size - The smallest detected square in pixels used as comparison during live view is 640x482 for Nikon cameras.
Devices

For Serial Port Shutter Release check this links
For DSUSB Shutter Release is sold at 3
For Usb relay is sold at 4
- Set the init to 5100
- Set the Shutter On
- For 2 way 03
- For 4 way 0F
- For 8 way FF
- Set the Shutter Off 00
- If the relay isn't recognized by Windows check this link http://www.ifamilysoftware.com/news37.html
Advanced

- Use parallel file transfer - This option has effect when multiple cameras are used. It is indicated to be unchecked some cases when 2-4 camera is used and is checked the transfer speed may increase.
- Show untranslated strings id.
- Disable native drivers - If checked, application will try to load cameras with wia drivers so no live view.
- Add fake camera - A virtual camera will be shown in connected camera list, this camera can be used for application testing and with an external trigger when no camera is connected.
- Sync camera date and time on camera connect - When a camera is connected, the camera time will be set from pc sytem date and time.
- Load thumbs in download window - If unchecked and when multiple camera are connected will improve the loading time of the file list in download windows.
- Automatically send usage statistics.